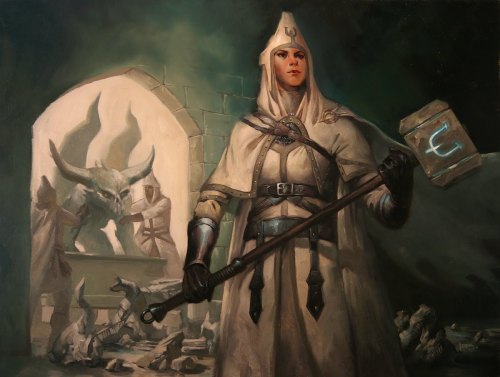
I've written in the past how I've used Magic the Gathering art to inspire some of my writing. Today I want to share with you a work-in-progress based on this particular card image (and you get bonus points if you can name the card without using Google search or something similar).
Looking at this piece of art, I imagined a priest who specialized in identifying and destroying items that contain dangerous or evil arcane energies. This seemed like the perfect setup for a story about a series of objects that the priest encounters, and how he unwittingly falls prey to dark magicks hidden within. Here, then, is the first 150 words or so, which encapsulates the scene from the art. Enjoy!
Berend swung his maul, scattering shards of pottery across the stone chamber and unleashing a burst of sand into the air. A cloud of grit slowly settled amidst the jagged pieces of what had once been a statue, causing the robed figure to cough. He kicked at the debris scattered across the sigil of Piotyr inscribed on the floor, grinding a small fragment under his boot. Satisfied, he turned as two figures approached, burdened by the second of the grotesque statues that had been dragged into the temple after being found outside that morning.
“By the Light, your pride will be the death of you someday, Berend,” the first said. “You didn’t even bother to lay down a Protection sigil?”
He snorted. “You worry too much. Ugly as they are, they're hardly tainted at all. I don’t know why they even bothered sending them up here.”
Showing posts with label Artwork. Show all posts
Thursday, June 8, 2017
Tuesday, April 1, 2014
More Inspiration from Artwork
I have always been interested in what sparks inspiration.
Just a few weeks after starting this blog, I posted a long explanation of how artwork from Avacyn Restored had inspired the plot of the fantasy novel that I have been writing off and on for the past couple years.
Today, I wanted to share with you a few more of my favorite fantasy artwork and discuss the stories that these pieces of art have inspired.
1. I already shared this piece of artwork with you several weeks ago, along with the accompanying story. What I loved about this picture is the long winding sheet that is wrapped around the ghost, and how it seems to be held together by the long flowing links of chains. The fact that it is set within a beautiful Gothic cathedral as the sun begins to set made it all the more alluring. I greatly enjoyed the story about who this ghost really was and how he came to be bound within those chains. If you missed it, you can read my short story here.
2. As someone who fondly remembers living on the side of a mountain during a snowstorm, this scene immediately caught my eye. I love the way the light cuts through the snow, the symmetry of the gardens in the courtyard, and the fantastic architecture. This scene inspired a story about a wizard who created two golems animated by the memories of his dead children. I imagined this is what the protagonist sees as he descends towards the castle.
3. The blue monochromatic tint of this image, coupled with the horror of the poor soul trapped within the sphere, makes this such a powerful image. The endless colonnaded hallway, the pattern on the figure's robes, and even the small details like the vial in the figure's hands and what looks like a glowing urn were all details that inspired me. I am currently working on a short story of a mage who willingly allows himself to be trapped within this prison so as to pull off the ultimate heist against his captors.
4. My final image is of this amazing treetop village set within a rugged mountain wilderness. I love the geometric shapes of the windows and balconies, the way the structures blend with the trees, and the delicate rope bridges that span the different homes. While this clearly evokes the stereotypical elven settlement in the wilderness, I hope to tell a very different story someday set within this beautiful town. If you have ideas, I'd love to hear them!
What will inspire you?
Just a few weeks after starting this blog, I posted a long explanation of how artwork from Avacyn Restored had inspired the plot of the fantasy novel that I have been writing off and on for the past couple years.
Today, I wanted to share with you a few more of my favorite fantasy artwork and discuss the stories that these pieces of art have inspired.
1. I already shared this piece of artwork with you several weeks ago, along with the accompanying story. What I loved about this picture is the long winding sheet that is wrapped around the ghost, and how it seems to be held together by the long flowing links of chains. The fact that it is set within a beautiful Gothic cathedral as the sun begins to set made it all the more alluring. I greatly enjoyed the story about who this ghost really was and how he came to be bound within those chains. If you missed it, you can read my short story here.
2. As someone who fondly remembers living on the side of a mountain during a snowstorm, this scene immediately caught my eye. I love the way the light cuts through the snow, the symmetry of the gardens in the courtyard, and the fantastic architecture. This scene inspired a story about a wizard who created two golems animated by the memories of his dead children. I imagined this is what the protagonist sees as he descends towards the castle.
3. The blue monochromatic tint of this image, coupled with the horror of the poor soul trapped within the sphere, makes this such a powerful image. The endless colonnaded hallway, the pattern on the figure's robes, and even the small details like the vial in the figure's hands and what looks like a glowing urn were all details that inspired me. I am currently working on a short story of a mage who willingly allows himself to be trapped within this prison so as to pull off the ultimate heist against his captors.
4. My final image is of this amazing treetop village set within a rugged mountain wilderness. I love the geometric shapes of the windows and balconies, the way the structures blend with the trees, and the delicate rope bridges that span the different homes. While this clearly evokes the stereotypical elven settlement in the wilderness, I hope to tell a very different story someday set within this beautiful town. If you have ideas, I'd love to hear them!
What will inspire you?
Friday, January 17, 2014
How I Create Trophies for MPDC, Part Two
Last time, I discussed the circumstances that led me to start creating trophies for Monday Pauper Deck Challenge and then posted links to all the tools I use in my process. As I mentioned last time, my hope is that through reading this post others, possessing greater artistic talent than myself, will recognize just how woeful my efforts are and take over this job from me. Or, failing that, at the least others will be able to step up and create trophies for other Player Run Events on PDCMagic.
For the sake of this post, I will be creating a trophy for SPDC 20.01. You reference, you can view the winning decklist here.
The first step is to pick the card art for the trophy. The best source for this is magiccards.info, which has larger scans of every Magic card available. For this season, we have already determined that White Weenie decks will use art from Auramancer, so that's the art that I will download.
Next, I open up the template file I referenced last time for Standard, which has a default name of standardblank.psd. Opening this in Paint.net, you arrive at a screen like this:
Now, we need to input the card art into the template. Select "File, Open" and click on the Auramancer artwork. Using the rectangle select tool, select only the artwork itself, then click on "Edit, Cut." In the upper-right hand corner, click back to the trophy template.
Next, select "Edit, Paste into New Layer." In the dialog box that pops up, select "Keep canvas size." By default, it will paste the artwork into the lowest layer, which means that it may not be visible at this moment. In the "Layers" window on the right, unselect the check boxes for all of the other card art until the picture of the Auramancer is visible. Your screen should now look something like this:
Now then, we want to slide the artwork around until it looks right. This mostly personal preference, but it does make a difference.
At this stage, you can also tweak the artwork itself by increasing the Brightness and/or Contrast, or even tweak the Hue. You can find all of these options under "Adjustments" in the upper menu. I usually won't alter any of these more than 5-10 points or so. It's subtle, but it's often worth spending a few minutes playing with these to get a better result. In this case, I bumped up the Contrast by 10, decreased the Brightness by 10, and increased the Hue by 10.
With that, the hard work is already done. So now we need to take out the previous text and add in the right text for this event. Back in the Layers window, click on the "Deck" layer. Then, using the Eraser tool, remove the previous deck name. You'll notice that with this layer selected, none of the other elements are effected.
Now, to replace it. Select the Text tool, then select your Font and Size from just below the Menu Bar. For this trophy, I will select the "Arial Black" font at size 20. Next, select the color white. Then, type out the deck name ("White Weenie"). You'll notice right away that with the light card artwork, the font is difficult to read. To fix this, we want to create an outline around the text.
The easiest way to do that is to create a new layer just below the "Deck" layer. For reference, rename this "Deck Outline." Then, in this new layer, once again use the Text tool to write the deck name, with the same font and size, but with the color black. Once you type it out, you can actually move the letters around until it acts as an outline for the deck name.
Use this same process to change the Event and Player layers to the corresponding information. Typically you use a different font for these. I'll go ahead and use the "Elegance" font. If you're following along at home, the Event is SPDC 20.01 and the Player is xelz. When you finish, your trophy will look something like this:
Not too shabby, but there's a couple nice features we can add.
First off, let's add the most recent expansion symbol to make it clear when this deck was from. To do this, you want to find the Theros Common Expansion symbol. Once you have a copy of it, open it, resize it to 20 x 20, then copy/paste it into the "Symbol" layer. To make it transparent, simply double-click the "Symbol" layer, then drop the "Opacity" down to 200. Using the "Move Selected Pixels" tool, you can move the symbol around until it looks appropriate.
Second, let's add the White Mana symbol to the trophy. In Paint.net, open up the Mana-Symbols file that I linked to last time. Using the "Ellipse Select," select just the White Mana symbol, copy/paste it into a new document, resize it to 20 x 20, then paste it into the trophy template as a new layer. Rename this layer "Mana Symbols," then move around the symbol to where you want it.
At this point, you can add any additional tweaks here that you wish. Typically for SPDC I include a long line across the Player name and Event name to help differentiate it from MPDC trophies. So, create a new layer called "Line," then draw a straight line using the "Line/Curve" tool. I made mine White with a width of 3.
Finally, you can tweak the placement of any particular element by using the "Move Selected Pixels" tool with the proper layer selected.
And, at last, you have the final product I previewed at the top of this post. Just two last steps. First, go ahead and save the template, to speed things along next time. Second, you need to save the template as a gif file to upload. Click "File, Save As," select "GIF" in the "Save as type" box, and give it a name. When the next window pops up, just select "OK," then select "Flatten" on the next window. And there you have it! A .gif file ready to be uploaded to PDCMagic!
Hope you enjoyed this tutorial, and that it inspires you to create your own trophies. See you next time!
Thursday, January 16, 2014
How I Create Trophies for MPDC, Part One
Back in October, after much deliberation, I resumed my duties as host of Monday Pauper Deck Challenge, which is one of the most popular current Player Run Events on Magic Online. While I had done extensive hosting previously, there was one major responsibility that I had never undertaken: creating the "trophy" images for the winner of each event, like the one you see above. In the past, this duty had been taken on by various other members of the community, including a previous host of this event. But, these artists had long ago departed, and no one had yet stepped up to take over their role.
I am not sure at what point this became a normal feature for PDCMagic events, but I do know that trophies were created for the very first season of Monday Pauper Deck Challenge. Given such a long-standing tradition, it seemed a shame to neglect it going into the future. So, although I do not consider myself by any means skilled in artwork, digital or otherwise, I decided to take on the long-neglected duty of creating trophies each week.
I managed to uncover a few helpful hints buried in the Artwork forums over at PDCMagic, along with some old fonts and templates. Then, with a little more research, I found a free, open-source graphics program powerful enough to do the job without having the overwhelming complexity of something like Photoshop. After that, after about an hour of playing around, I was able to create my first trophy.
So, with that as a preamble, I decided to write a quick two-part post on how I create trophies for MPDC. Perhaps it will inspire others to create them for other Player Run Events. Or maybe someone will come along with real artistic gifts, give me a pat on the head for my feeble efforts, and quietly take this role away from me...
Anyway, the first step, naturally, is assembling all the pieces you'll need. Here they are:
- A graphics program. I ended up using Paint.net, which is free, intuitive, and powerful. While it doesn't support the Photoshop file type natively, there is a free plugin that remedies that issue, allowing you to make use of the template below.
- Fonts. While not strictly necessary, to provide some connection to previous trophies, I found it helpful to download this particular batch of fonts. Currently, I make use of Elegance and Magic Medieval.
- Templates. Previous templates exist that were used for Standard, Classic, and Extended. These are blank Photoshop files that will save you a tremendous amount of time. My trophies are based off the Standard template.
- Mana Symbols. I also wanted some nice looking mana symbols for the trophies, and I found this particular set by FRAGment2K to be particularly good.
Thanks for reading.
Subscribe to:
Posts (Atom)